Hello, fellow Minecraft enthusiasts! Today, we’ll be embarking on a pixelated adventure of discovery as we delve deep into the world of anti-aliasing. If you’ve ever wondered why the jagged edges of your meticulously constructed creations can sometimes detract from the overall aesthetics, then this blog post is for you!
We’ll cover the fascinating concept of anti-aliasing, what it means for your Minecraft experience, and how to address any potential issues you might encounter.
Anti-Aliasing in a Nutshell
Before we mine too deep into the Minecraft context, let’s take a moment to understand anti-aliasing in a broader sense. Anti-aliasing is a technique utilized in digital image processing that helps to reduce the visual distortion known as aliasing.
Aliasing? Picture this: you’re crafting a circular structure in Minecraft and notice that instead of a smooth curve, the edges appear jagged, almost like a staircase. This ‘staircase effect’, also known as ‘jaggies,’ is aliasing.
Anti-aliasing combats this problem, smoothing out the graphics and making objects in the game appear less pixelated and more realistic. This technique blurs hard edges and transitions the colors between pixels, providing your virtual world with a polished look and feel.
How It Is Utilized in Minecraft
Minecraft, being a game of blocks and pixels, is inherently prone to a high level of aliasing. This blocky aesthetic forms part of its iconic charm; however, the visual distortion can sometimes distract from the immersive experience.
The standard version of Minecraft doesn’t include built-in anti-aliasing capabilities, but fear not! There are ways to enable anti-aliasing and improve the visual fidelity of your game.
Before proceeding, it’s important to note that anti-aliasing can be more demanding on your system’s resources. As it works to refine and smooth images, it requires additional processing power. So, ensure your hardware is up to the task before enhancing your graphics settings, especially if you’re considering playing at higher resolutions like 1080p or 1440p.”
How to Enable Anti-Aliasing in Minecraft?
One popular method of introducing anti-aliasing into Minecraft is through shaders. Shaders are mods that overhaul Minecraft’s graphics, enhancing the game’s lighting, shadows, water effects, and, yes, incorporating anti-aliasing. A few prominent shader packs like SEUS (Sonic Ether’s Unbelievable Shaders), BSL Shaders, or Sildur’s Vibrant Shaders offer built-in anti-aliasing options.
To enable anti-aliasing via shaders, follow these steps:
- First, ensure you have the Minecraft Forge or OptiFine installed. These mods are essential as they allow the implementation of shaders. You can download these mods from their official websites.
- Download your shader pack of choice and move it into the ‘shaderpacks’ folder in your ‘.minecraft’ directory.
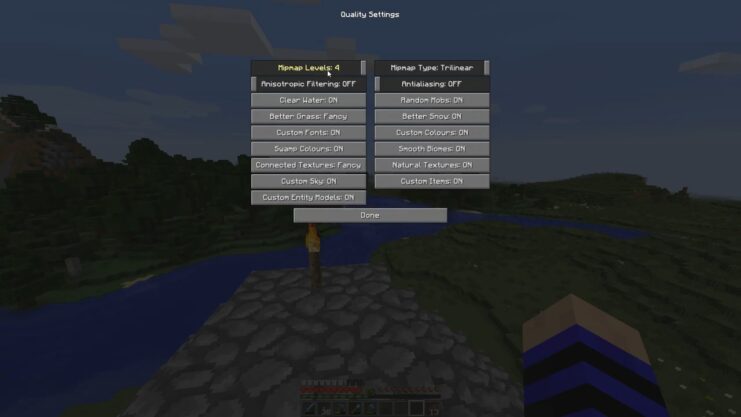
- Launch Minecraft, then navigate to ‘Options’ > ‘Video Settings’ > ‘Shaders.’ Here, you should see your installed shader pack.
- Select your shader pack and look for an ‘Anti-Aliasing’ or ‘AA’ option. Depending on the shader, you might have a few different levels of anti-aliasing to choose from.
- Enable the level of anti-aliasing that suits your preference. The higher the level, the smoother the edges, but the more resource-intensive it will be.
- Save your changes and return to your game. You should now see an improvement in the game’s visuals.
Addressing the Issues
Now that we understand what anti-aliasing is and how to enable it in Minecraft, let’s discuss how to troubleshoot potential issues.
1. Performance Drops
As we’ve mentioned, anti-aliasing requires additional processing power. If you’ve enabled it and are experiencing performance drops, there are a few potential solutions:
- Reduce Anti-Aliasing Level: Lower the level of anti-aliasing in your shader pack’s settings. This lessens the load on your system while still providing a degree of visual enhancement.
- Adjust Video Settings: Lower your other video settings in Minecraft, like render distance or particle effects. This helps free up resources for anti-aliasing.
- System Upgrade: If all else fails, you might need a hardware upgrade. Consider getting a more powerful graphics card or additional RAM.
2. Visual Glitches
Occasionally, you might experience visual glitches, like flickering or texture errors. This could be due to a conflict between the shader pack and Minecraft’s base graphics settings.
- Tweak Shader Settings: Experiment with different settings in the shader pack’s options menu. Disabling other graphic enhancements may resolve the conflict.
- Try a Different Shader: If the problem persists, consider trying a different shader pack. Each pack is unique and may interact differently with your specific system.
3. Compatibility Issues
Some shaders might not be compatible with certain versions of Minecraft, Forge, or OptiFine.
- Update Everything: Ensure that Minecraft, Forge, OptiFine, and your shader pack are all updated to their latest versions.
- Read Documentation: Check the shader pack’s documentation or website. They will typically list any known compatibility issues and how to resolve them.
Super Sampling and Ray Tracing
Now that we’ve explored the intriguing realm of anti-aliasing in Minecraft and addressed potential issues let’s expand our visual improvement toolbox with a couple more concepts: super sampling and ray tracing. These techniques can truly revolutionize your Minecraft experience when combined with anti-aliasing, provided your hardware can support them.
Super Sampling
Super sampling, also known as Supersample Anti-Aliasing (SSAA), is a form of anti-aliasing that can provide even better image quality. Unlike standard methods, which mainly smooth out the edges of objects, super sampling applies anti-aliasing to the entire image. The result is an even crisper and smoother image, free from both jaggies and pixelation.
Super sampling achieves this by rendering the game at a much higher resolution than your display’s native resolution, then downscaling the image to fit your display. This provides a highly detailed image, with both textures and edges appearing smoother.
However, it’s essential to bear in mind that super sampling is significantly more resource-intensive than regular anti-aliasing. Rendering the game at higher resolutions requires more processing power and memory. Therefore, it’s primarily a feature for high-end systems.
Currently, there is no native super sampling option in Minecraft. However, certain shader packs might include this feature, or you can achieve a similar effect through your graphics card’s control panel. NVIDIA, for instance, offers Dynamic Super Resolution (DSR), while AMD provides Virtual Super Resolution (VSR). These features allow you to render games at higher resolutions, mimicking the effect of super sampling.
Ray Tracing
Next, let’s discuss a revolutionary graphic enhancement technology: ray tracing. Ray tracing is a rendering method that simulates the physical behavior of light, resulting in stunningly realistic shadows, reflections, and lighting effects.
With the introduction of the NVIDIA RTX series graphics cards, ray tracing has become a prominent feature in many modern games, and Minecraft is no exception. Thanks to the Minecraft RTX beta and various shader packs, you can experience ray-traced Minecraft.
Minecraft RTX, available only for the Windows 10 version of Minecraft, completely overhauls the game’s graphics, adding path-traced ray tracing, physically-based textures, and NVIDIA’s Deep Learning Super Sampling (DLSS) technology. The result is a Minecraft experience that looks truly next-gen, with realistic lighting and shadows, reflections in bodies of water, and smooth textures.
For the Java Edition of Minecraft, shader packs like SEUS PTGI (Path Traced Global Illumination) offer ray tracing-like effects. These shaders use path tracing, a type of ray tracing, to simulate realistic lighting effects. While not quite as advanced as Minecraft RTX, these shader packs can significantly enhance the game’s visuals, providing a pseudo-ray tracing experience.
Wrapping Up
While Minecraft’s charm lies in its simple, blocky graphics, there’s no denying that graphic enhancements like anti-aliasing, super sampling, and ray tracing can elevate the game’s visuals to another level. From smoothing out those blocky edges to creating realistic lighting and shadows, these features can make Minecraft not only more immersive but also a showcase of what your gaming rig is capable of.
However, always remember that these features require more powerful hardware. If you’re planning to use these graphic enhancements, ensure your system is up to the task. But with the right setup, you’ll be on your way to experiencing Minecraft like never before!